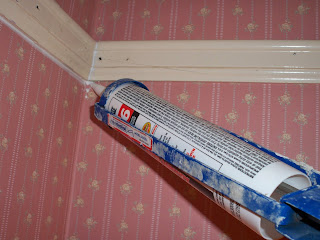
Since hubby has been workin so hard puttin up trim everywhere (as if this house needed any more), I've had to take up the task of caulking. This is pretty important since caulk is the magical little ingredient that makes your trim run seamlessly into the wall and flawlessly into another piece of trim.
More importantly, caulk can hide any imperfections, where perhaps corners don't meet-up just right or walls are exactly squared, plumb, and/or level....ok, well, you might have to start over if things aren't plum of level....but caulk is a miracle worker none-the-less. Admittedly, at first this was a bit overwhelming, and well, uh, messy. We cut the tip too wide, laid too much out, and wore my fingers raw spreading goopy globs of white lightening (no joke). A little time and a little practice, and we got it all sorted out and lookin good!
First, you need a GOOD caulk gun....as always, tools make all the difference. Buying a good caulk gun is not a big deal...it means you're gonna spend $5 rather than $0.99. Get one with a little hole in the handle, as this is where you cut open your caulk tubes. A 2 in 1 tool? nay! A 3 in 1....see that silvery stick near my thumb in the pic below? That is what you jab down into the tube after you snip it open to break the seal and allow the caulk into the tip. This way, whenever you need a new tube (and we used 4 in one bathroom...holy moly), you don't have to run all around lookin for clippers and screwdrivers. Again, the GOOD gun :o)
 When you're snipping the tip off, do it an an angle, and be conservative. Only cut off about 1/4 inch off the tip. You can see how small the opening is in the pic below. This will give you better control, and you'll have less waste. (I'm saying you, because YES, you CAN do this! And if your house is any older than brand-spankin new, odds are, there are some places that could use some touch up.....you will be AMAZED how much more "finished" your room will look after spendin a little time with a $2 tube of caulk.)
So here's on the left is the "before", to the right is an example of how you hold the gun...on a slight angle and pressed against the trim.


Here on the left, is what your bead of caulk should look like....small and consistant. On the left is the tentative "after" pic; it shows the bead after it has been smoothed down with your finger. Also notice that I did the seam where the two pieces of trim came together in the corner. Be sure to wipe over that with a damp rag to get rid of any mess on the trim. Caulk is VERY forgiving, and water saluble while it is still wet, but you're pretty much stuck with it once it's dry - no sandin, no nothin. So smooth as you go, finish what you start, and keep it clean! Now, I will say, there are tools for smoothing caulk, and after the disaster we started with, I bought one. But, once I got the tip snipping under control and didn't have caulk comin out my ears, I went back to just using my finger. If you opt to get the tool - and I won't judge you if you do - be sure to press if firmly against the wall to ensure a right angle, rather than pressing it into the corner you're tryin to caulk.


No comments:
Post a Comment