Tile - and what other dreams may come
before during
after!
1 Lay the Hardee Board (1/4 inch concrete board that the tile will lay on). It comes in 5'x3' boards, you just cut them to size and screw them down with these crazy little green screws (they are right next to each other in the store). You will need a high-powered drill to put them in, they need to be drilled down into the board, below the level you would consider "flush." If you have access to one, a roofing nailing is much faster and cheaper (you can skip buying the high-dollar green screws).
2. Plan out your pattern. We chose to lay our 13" square tiles on an angle, which takes more than 2x as long, but we think it's worth it. We also opted for a border, which is what you need to start with. If you're not doing a border, just start in the corner furthest from the door (because you wouldn't want to work yourself into the room...ha!)
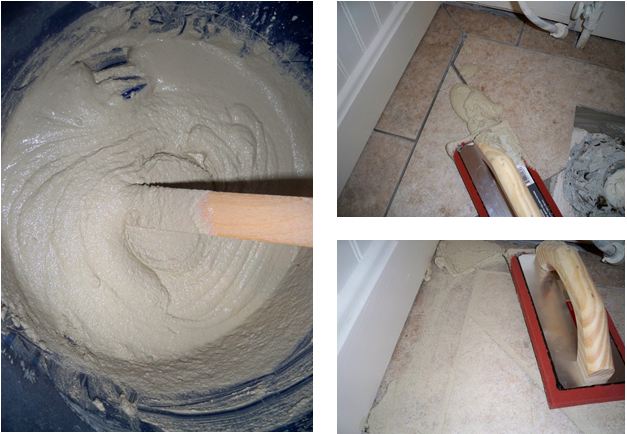
3. Measure and cut a few tiles, then spread your mortar and start laying. (I know the diy websites will tell you to cut and lay the whole room, then pick them up in stacks and lay it all at once, but that's really easier said than done, especially when workin on a diagonal.) Don't mix your entire bag of mortar, just a little at a time....if it starts to set up on you, just add a little more water (very little at a time!) It should be about the consistency of brownie batter (thicker than cake batter, but thinner than cookie dough...can ya tell I like to cook...or eat.....)
4. Ta-dah! But don't get too excited, we're not quite done yet. Time to grout! You'll need the "sanded" stuff (you'll understand when you go to buy it) and a rubber trowel, or "float" as they say. We have found that the cheaper, more flexible version works better than the high dollar stiff float. And again, mix it kinda like brownie batter. Then sling some onto the floor and start spreadin it around. Try to leave as thin a layer as possible on the top of the tiles, just to make your life easier for the next step of the process. Now stand up, and walk away from your messy bathroom - I know it's hard, but you'll be glad you did!
5. Clean-up! I recommend waiting at least an hour before you start trying to clean-up your grouted tiles. This will save you A LOT of time and effort. Start by taking a small, dry towel, and buffing the dry grout from the tops of the tiles. Then vacuum up the residue (I used my trusty shop-vac that has been oh-so-handy during the whole remodeling process) - if you have to use your regular up-right vacuum, be sure to turn off the brush, because the grout between the tiles is still wet and you don't want to mess with it too much. Then use a wet sponge to clean up any remaining grout from the tops of the tiles (sorry, I didn't get a picture of this, but the sponges you need will be in the same section of the hardware store where you found the grout and trowel, and everything really.) Be sure to rinse it out frequently - like, every 2 or 3 tiles frequently, otherwise you'll just be spreadin you mess around rather than cleanin it up. When you think it looks pretty good walk away again. Let it dry over night, then wipe it down one more time with the damp sponge.

6. Seal it up! Take a clean, dry sponge and start wiping your tiles and grout with sealer, focusing, of course, on the grout. This is SUPER important because grout is water-soluable, so without sealer it would crack and crumble. Also, sealer prevents any mold or mildew from being able to grow - which is always a good thing! Any sealer should be fine. I put on two coats, one right after the other, then waited a few hours before doing one final coat (as much as I love cleanin bathrooms, I'll take a little extra help keeping the mildew-free).
Ta-dah!


.JPG)
1 comment:
Looks great! Never realized how much fancier a tile job looks with a border. I'm always so inspired to tackle my own projects, and then I remember I have a newborn and I'm lucky to get dishes done on a regular basis. For now, I'll have to just live vicariously through you!
Post a Comment